AudioCodes OVOC Server Security Vulnerability and Required Remediation

On August 20, 2023, AudioCodes published Product Notice #0511 – Vulnerabilities Discovered and Subsequent Mitigations in One Voice Operations Center (OVOC) Server. The article provides configuration information to mitigate possible security vulnerabilities on One Voice Operations Center (OVOC) servers. The notice includes the recommended steps to mitigate these issues.

Vulnerability

  1. Exposure of the OVOC backup files.
    1. OVOC servers, by default, back themselves up daily.
    2. The backups are stored in the “/nbif/” directory on the server.
    3. Some of the backup files include sensitive information such as encrypted usernames and passwords.
    4. The directory can only be accessed by using the “nbif” user’s credentials.
  2. There are hardcoded cryptographic keys used in all OVOC installations. If an attacker obtains these keys, they can be used to decrypt all encrypted secrets in all OVOC installations.
  3. A directory traversal vulnerability in the OVOC Device Manager module. This would allow an attacker to gain access to the OVOC server’s underlying operating system files.
  4. Insecure file upload through the OVOC’s Device Manager module can be exploited by an attacker.

Remediation

High Level

There are two required changes to address the vulnerabilities:

  1. Upgrade the OVOC server software to 8.2.1268 or higher.
  2. Update the default passwords on several of the OVOC server accounts.


Once the software upgrade has been completed, the passwords can be changed. The password changes are made through the “Security” section of the “OVOC Server Manager” tool in the OVOC console.

Here are the detailed mitigation steps for each of the four (4) vulnerabilities:

  1. To mitigate the first vulnerability:
    1. Change the default password for the “nbif” user account. This will mitigate the first vulnerability.
  2. The second vulnerability is mitigated by changing several additional passwords and adding a new administrative user to the OVOC Server database:
    1. Change the OS password.
    2. Change the default database password.
    3. Change the “Cassandra” password.
    4. Add a new administrative user to the OVOC Server database.
  3. The third and fourth vulnerabilities are mitigated by upgrading the OVOC server to version 8.2.1368 or higher.
OVOC Server Software Upgrade
  1. Make sure that you have the latest version of the “OVOC Installation, Operation and Maintenance (IOM) Manual”. You can find a link at the end of this article.
  2. The OVOC server can be installed for one of two (2) profiles. The selection of a profile is based on the required capacities of the OVOC server for a client’s deployment. The two (2) most frequently assessed capacities are listed below. Refer to the IOM manual to determine the profile of your OVOC server that meets your capacity requirements:
    1. Low Profile
      1. Up to 100 Session Border Controllers (SBCs), Gateways, Analog Transfer Adapters (ATAs), etc. under management.
      2. Up to 1,000 telephony endpoints under management.
    2. High Profile
      1. Up to 5,000 SBCs, Gateways, ATAS, etc.
      2. Up to 30,000 Lync/Skype for Business or third-party telephony endpoints and 20,000 Teams Devices.
    3. Your OVOC server was provisioned based on the profile you decided to use when it was originally installed. As you are preparing to do the upgrade, the hardware requirements for the new version of the software for your profile may have changed. The OVOC server may not be correctly provisioned for the combination of your selected profile and the new software.
    4. Refer to the Hardware and Software Specifications in the IOM manual to get the requirements for your OVOC server based on its profile and version 8.2.1368 (or newer) version of the software.
    5. Before performing the upgrade, ensure that the OVOC server meets the minimum requirements for its required profile.
    6. Backup your OVOC server before performing the upgrade:
      1. If the OVOC server is running as a Virtual Machine (VM), use the built-in tools of the Hypervisor to perform a snapshot or backup of the OVOC virtual machine.
      2. If you are running your OVOC on a physical device, use the tool you regularly use for your backups. If you aren’t regularly backing this machine up, you should be!
    7. The following steps can be found in the IOM manual. Here is a high-level overview of the process:
      1. Download the version 8.2.1368 (or newer) upgrade file, “DVD3_EMS_8.2.1368.iso”. You will need to have created a user account from the AudioCodes Services Portal to access this file. If you do not have an account, please contact us and we can assist you.
      2. Using the WinSCP, or similar utility, copy the file to the “/home/acems” directory on the OVOC server.
      3. Using SSH, sign onto the OVOC server and switch to the “root” user.
      4. Mount the ISP with “mount /home/acems/DVD3_EMS_8.2.1368.iso /mnt”.
      5. Change directory into the directory on the mount point with the installation script: “cd /mnt/EmsServerInstall”.
      6. Run the installation script with “./install”.
      7. Enter “y” and press the “Enter” key to accept the License agreement.
      8. Once the installation completes you will need to reboot the OVOC server by typing “reboot”.
      9. Sign back into the OVOC server, switch to the “root” user and start the EMS Server Manager.
      10. Make sure that all the services are up and running.
      11. Sign into the web-based OVOC client to verify its functionality.

Upgrading from OVOC Server Version 8.0

  • One of the new features in the 8.2 version of the OVOC is a change from the “Oracle DB” for its internal database to “PostgreSQL”.
  • Because of this change, if you are upgrading an 8.0 OVOC server to 8.2, the data for calls, statistics and alarms will not be preserved.
  • If you need to preserve this data:
    • Install a new OVOC server from scratch. The new OVOC server must be running the same version of software as the original.
    • Make sure that the new OVOC server is not reachable by any managed devices.
    • Disable Network Time Protocol (NTP) on the new server.
    • Generate and install a license using the existing product key of the original OVOC server.
    • Copy the backup files from the original OVOC server to the new server.

Upgrading from OVOC Servers with Older Software

Password Changes
  1. Before making any password changes, backup the OVOC server.
    1. If the OVOC server is running as a Virtual Machine (VM), use the built-in tools of the Hypervisor to perform a snapshot or backup of the OVOC virtual machine.
    2. If you are running your OVOC on a physical device, use the tool you regularly use for your backups. If you aren’t regularly backing this machine up, you should be!
  2. The OVOC server is built on Linux, keep in mind that almost everything you do in Linux is case-sensitive!
  3. You will need to change these default passwords:
    1. nbif account.
    2. acems account (OS password).
    3. Default Database-PostgreSQL.
    4. Cassandra
  4. eGroup | Enabling Technologies recommends that the password of the “root” account also be updated. This is not a requirement to mitigate the security vulnerabilities described.
  5. You will also be adding a second OVOC user account and password.
    1. Determine a name and password for this account.
  6. The default minimum length for passwords is ten (10) characters. This can be changed but eGroup | Enabling Technologies recommends that it be left as is.
  7. Plan on using different passwords for each of these user accounts.
  8. Securely make a note of all these passwords. You can use this table to document the new passwords and the new OVOC user information. Store this information securely or destroy it once the changes have been completed.

ncif Password

1. Using SSH, sign onto the OVOC server and switch to the “root” user.

2. At the “#” sign prompt type “EmsServerManager” and press the return key.

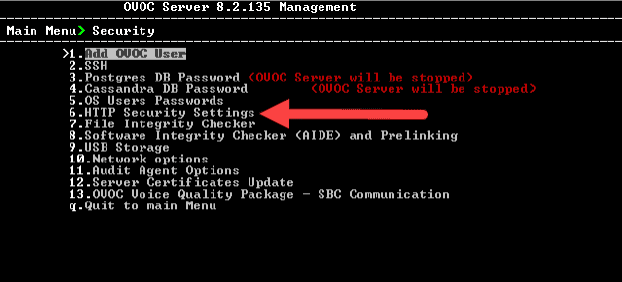
3. From the “Main Menu”, select option “7. Security”.

4. From the “Security” menu, select option “6. Security”.

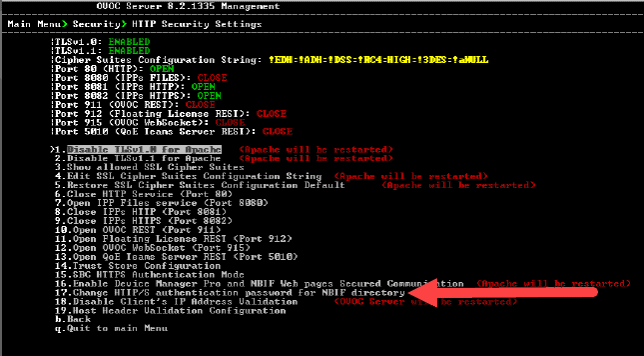
5. From the “HTTP Security” menu, select option “17. Change HTTP/S authentication password for NBIF directory”.

6. Type “y” and press enter in response to the question “Would you like to change HTTP/S authentication password for NBIF directory (Username: nbif)?”.

7. Follow the prompts to change the password. You may not be prompted for the old password.

8. The Apache server will restart.

9. Return to the “Security” menu.

acems and root Accounts

  1. From the “Security” menu, select option “5. OS Users Passwords”.
  2. Type “n” and press enter in response to the question “Do you want to change general password settings?”.
  3. Type “y” and press enter in response to the question “Do you want to change password for a specific user?”.
  4. At the prompt “Enter Username [acems]:”, type “acems” and press enter.
  5. Follow the prompts to change the password. You may not be prompted for the old password.
  6. Repeat this process to change the password for the “root” account.
  7. Return to the “Security” menu.

Default Database-PostgreSQL Password

1. From the “Security” menu, select option “3. Postgres DB Password”.

2. Type “y” and press enter in response to the question “Would you like to change Postgres DB password?”.

3. When prompted, type in the default password.

4. Follow the prompts to change the password.

5. Return to the “Security” menu.

Cassandra DB Password

1. From the “Security” menu, select option “4. Cassandra DB Password”.

2. Type “y” and press enter in response to the question “Would you like to change Postgres DB password?”.

3. When prompted, for the “Current Password:”, press enter.

4. Follow the prompts to change the password.

5. Return to the “Security” menu.

Add an OVOC User

1. From the “Security” menu, select option “1. Add OVOC User”.

2. Enter the name of the new user and press enter.

3. Enter the password for the new user and press enter.

4. Type “y” to confirm your changes and press enter.

5. When prompted, for the “Current Password:”, press enter.

Summary

  • AudioCodes recommends that all OVOC servers be mitigated to address the security vulnerabilities described.
  • If your OVOC server is currently running version 8.0.x software, existing historical data will be lost during the upgrade to 8.2.x. This data can be preserved by copying it to a second non-production OVOC server running the software version of the original server.
  • Upgrading an OVOC server with older software requires additional steps.
  • The default passwords on several of the OVOC servers accounts must be updated.
  • Updating of the “root” account’s password is not part of the remediation steps provided by AudioCodes. eGroup | Enabling Technologies does recommend that this password be updated.

eGroup | Enabling Technologies is available and ready to answer any questions that you might have about this security update and its mitigation, as well as overall security for your enterprise. If you need help with this process or in implementing a security infrastructure for your organization, please contact us at info@eGroup-us.

Bibliography

John Miller

John Miller

Cloud Solutions Architect - eGroup | Enabling Technologies

Learn More About AudioCodes Configurations

Contact our team of experts to learn how you can protect yourself from vulnerabilities and strengthen your security!