


Endpoint Privilege Management is a crucial aspect of IT security and compliance. It involves granting the minimum level of permissions and privileges necessary for devices and users to perform their tasks, while preventing unauthorized or malicious actions. Endpoint Privilege Management can help reduce the risk of data breaches, malware infections, ransomware attacks, and other cyber threats.
The purpose of this article is to show you how to deploy and manage Microsoft Intune Endpoint Privilege Management (EPM) for standard users, along with showing the end user and administrator experiences throughout the process for a single application. As a user needs to install an application, they will be required to request elevated access. Once an administrator approves, they will be notified that the application is available to install with elevated privileges. I will also demonstrate how to see if the user installed the application using Microsoft Intune device query. Microsoft Intune EPM and Device Query are part of the Microsoft Intune Suite add-on licensing.
Prerequisites
To deploy Microsoft Intune EPM, you will need the following:
- An Entra ID (Azure Active Directory) tenant with a Microsoft Intune subscription.
- Windows 10/11 devices enrolled in Microsoft Intune and assigned to standard users.
- The application installer file (e.g., MSI, EXE, etc.) and the corresponding detection rules.
- A security group that contains the users who need elevated access to install the application.
- A Microsoft Intune EPM elevation settings and rules policy.
- License requirements and software versions for Microsoft Intune EPM:
-
- EPM Standalone or Microsoft Intune Suite license for each required user.
-
- You can also obtain a trial.
- Supported Operating Systems:
-
- Windows 11, version 23H2 (22631.2506 or later) with KB5031455
-
- Windows 11, version 22H2 (22621.2215 or later) with KB5029351
-
- Windows 11, version 21H2 (22000.2713 or later) with KB5034121
-
- Windows 10, version 22H2 (19045.3393 or later) with KB5030211
-
- Windows 10, version 21H2 (19044.3393 or later) with KB5030211
Deployment
We will be walking through the Microsoft Intune EPM configuration targeting the Microsoft Remote Desktop application. However, you can apply similar principles to your own applications.
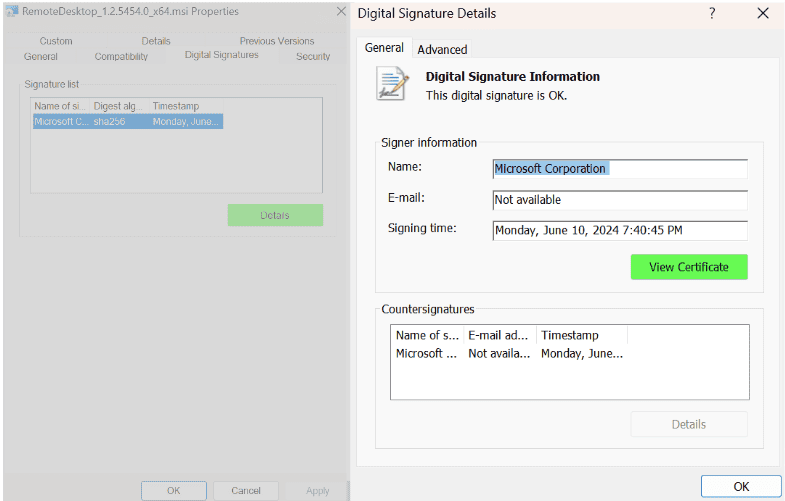
- Obtain the certificate of the application by right clicking the application and selecting “Properties.”
- Select “Digital Signatures” and click on “Details.”
- Click on “View Certificate.”
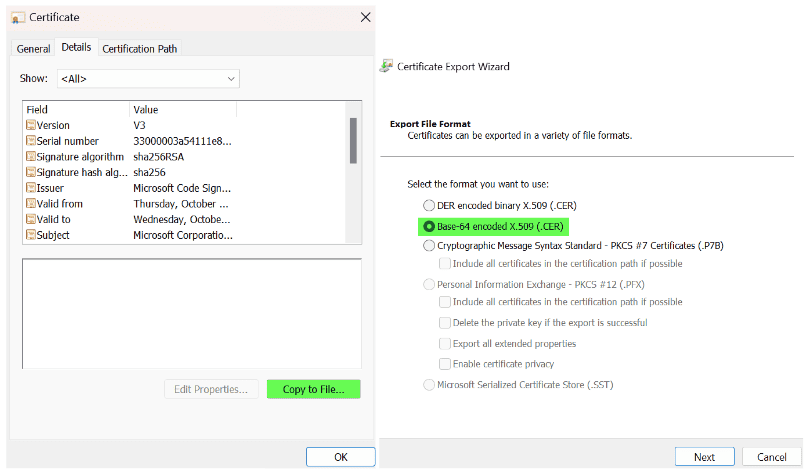
- Click on “Details” again and select “Copy to File.”
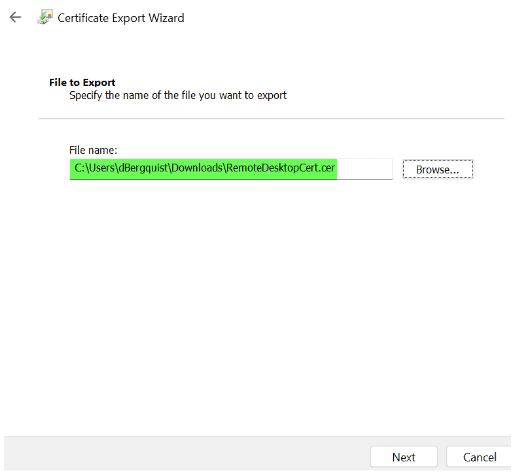
- Save the certificate as “Base-64 encoded X.509 (.CER).
- In the Microsoft Intune Admin Center, go to Endpoint Security -> Manage -> then select Endpoint Privilege Management.
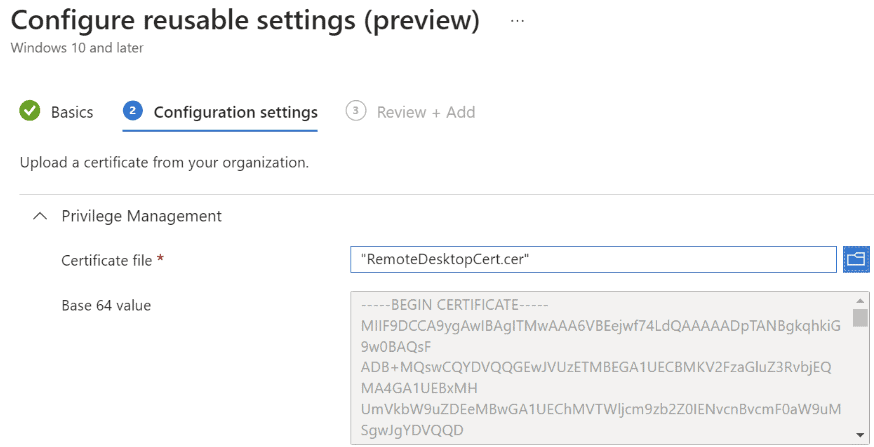
- Select “Reusable settings,” then click on “+Add:”
- Name: Microsoft Remote Desktop Certificate
- Certificate File: Browse to the Microsoft Remote Desktop certificate that was exported in step 1 and select it.
- Click on “Next,” then “Add.”
- Select “Reusable settings,” then click on “+Add:”
- Select “Policies,” then click on “+ Create Policy:”
- Platform: Windows 10 and later
- Profile: Elevation settings policy
- Click on “Create”
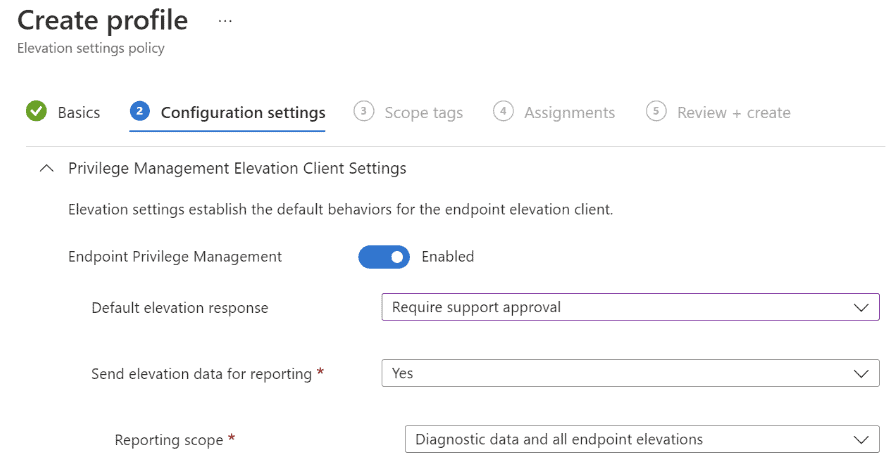
- Name: EPM SP: Require Support Approval
- Endpoint Privilege Management: Enabled
- Default elevation response: Require support approval
- Send elevation data for reporting: Yes
- Reporting scope: Diagnostic data and all endpoint elevations
- Click on “Next” and assign to your desired security group(s), then “Create” the policy
- Select “Policies,” then click on “+ Create Policy:”
- Platform: Windows 10 and later
- Profile: Elevation rules policy
- Click on “Create”
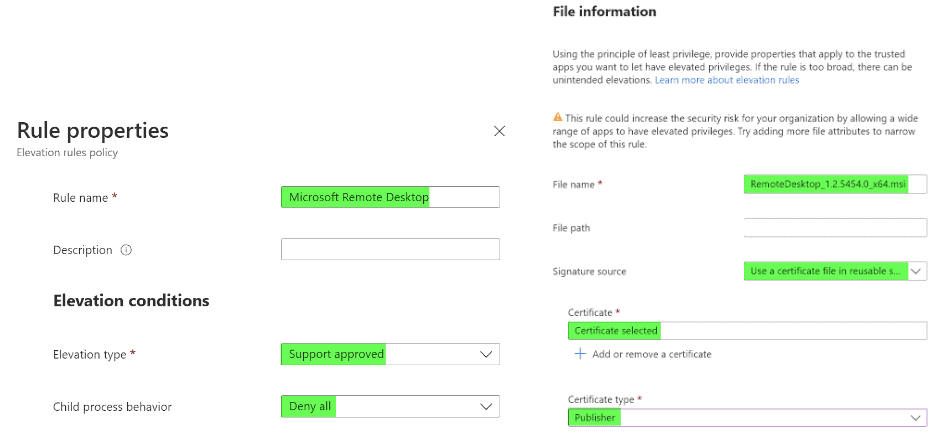
- Name: EPM RP: Microsoft Remote Desktop
- Privilege Management: click on “+ Edit Instance”
- Rule Name: Microsoft Remote Desktop
- Elevation type: Support approval
- Child process behavior: Deny all
- Filename: RemoteDesktop_1.2.5454.0_x64.msi
- Signature Source: Use a certificate file in reusable settings
- Certificate: Select “+ Add or remove a certificate” and select the required certificate (in this case Microsoft Remote Desktop Certificate).
- Certificate Type: Publisher
- Add file hash, minimum version, file description, product name, and internal name if desired
- Click “Save,” then “Next”
- Assign the EPM rules policy to your desired security group and “Create”

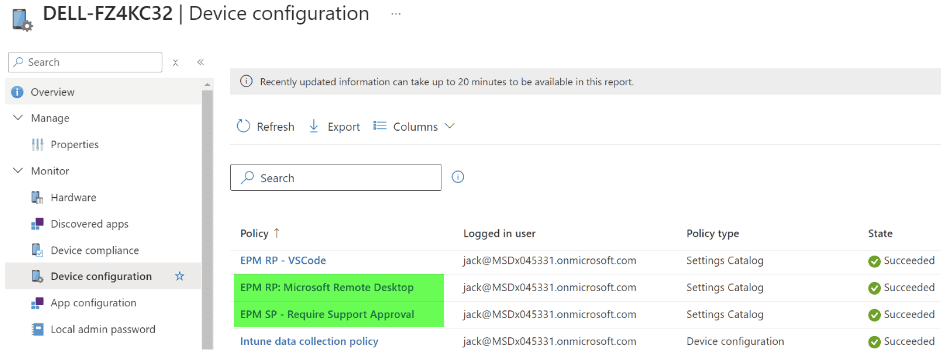
- Ensure the policy is assigned to the user/device:
-
- You can monitor the policy assignment by device: Devices -> Windows Search for the device -> Device Configuration. Ensure the policies are successfully assigned.
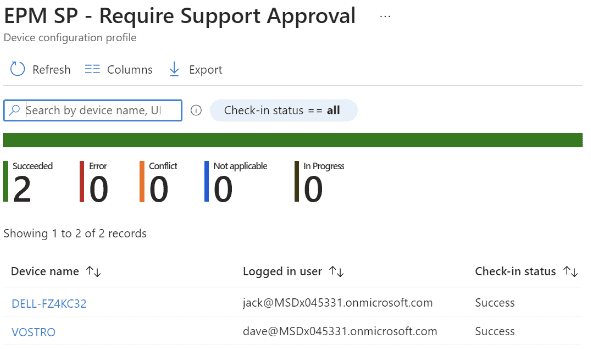
2. You can also monitor by the policies themselves: Endpoint Security -> Endpoint Privilege Management -> select a policy -> View report.
An End-User Experience
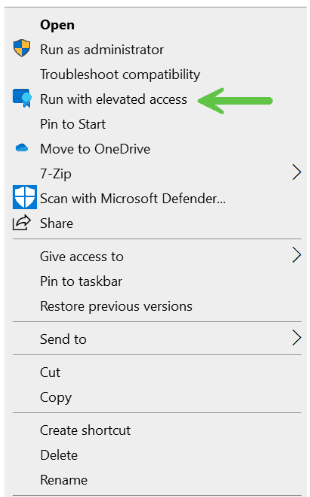
An end user can request access to install the Microsoft Remote Desktop application by right clicking the file and selecting the “Run with elevated access” option.
Before Microsoft Intune EPM is applied: Access should be denied for standard users until approval has been given.

After Microsoft Intune EPM is applied: Will allow the user to request access and install once an administrator approves. The end user will get a Windows toast notification once approved. This could take 15 minutes, give or take.
Business Justification: Once the end user runs the application with elevated access, they will be required to provide a business justification.
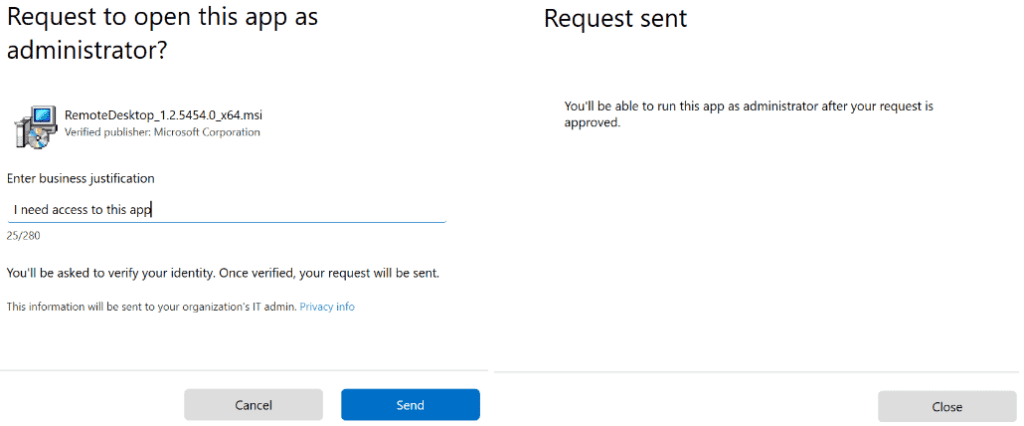
User Notification: Once the administrator approves the request, the user will receive a Windows toast notification that they can now run the application with elevated access.

Administrator Experience
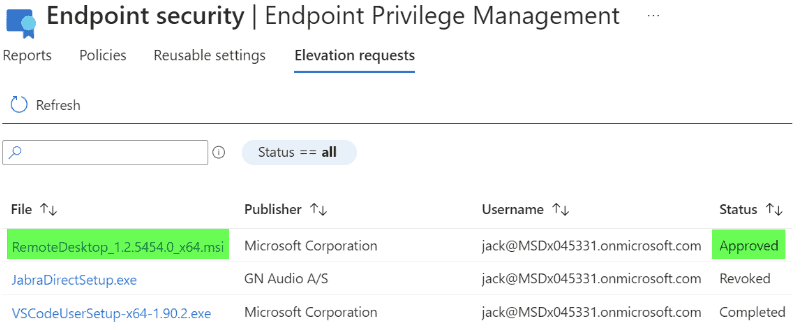
Administrators must use the “Elevation Requests” tab to view pending requests. Currently, they do not get notified by any other means.
View elevation requests: Via the Microsoft Intune Administration portal, the administrator can go to: Endpoint Security -> Endpoint Privilege Management -> Elevation Requests:
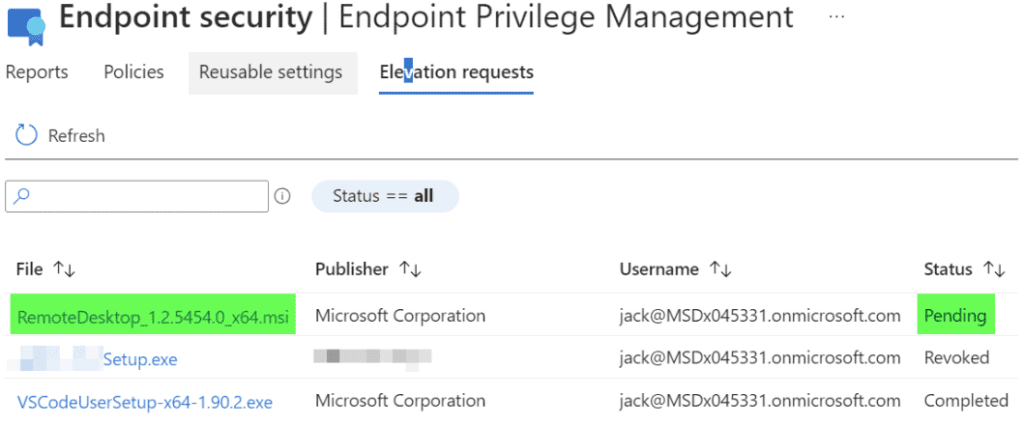
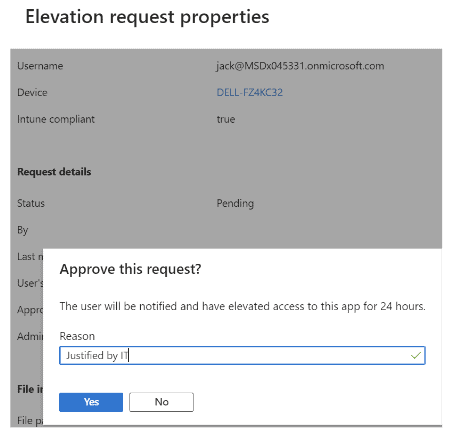
Approve, Deny, Revoke: An administrator can select the app and either approve or deny the initial request. You can also revoke access post approval.

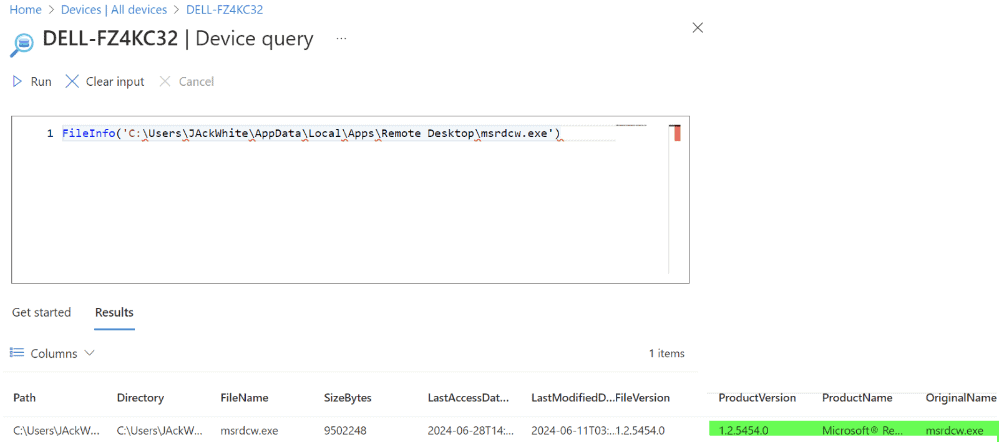
Device Query: An administrator can check to see if the application has been installed on the device using Microsoft Intune device query. In this example, we will check to see if the exact file is installed in the expected directory:
- FileInfo(‘C:UsersJackWhiteAppDataLocalAppsRemote Desktopmsrdcw.exe’)
As you can see, the Microsoft Remote Desktop executable was discovered showing the application was installed.
Benefits of Microsoft Intune Endpoint Privilege Management
By using Microsoft Intune Endpoint Privilege Management, IT administrators can achieve the following benefits:
- Enhance security and compliance: Protect devices, data, and the identity of the organization from unauthorized or malicious access, in addition to complying with regulatory and industry standards.
- Improve productivity and user experience: Optimize the performance and functionality of devices and apps, as well as providing consistent and seamless user experiences across different platforms and scenarios.
- Simplify management and administration: Streamline and automate the management and administration of devices and apps, along with providing visibility and insights into the status and activity of the endpoint environment.
Summary
Microsoft Intune Endpoint Privilege Management is a powerful and flexible solution that can help IT administrators control and monitor the access rights of devices and users, while ensuring security, compliance, productivity, and user experience. It can be easily configured and deployed from the cloud, and support a variety of devices, apps, and scenarios.
We Can Help!
If you have any questions or are looking for assistance in creating a Modern Endpoint Management strategy or deploying Microsoft Intune Endpoint Privilege Management as part of your device management solution, please reach out to info@eGroup-us.com or complete the form below.
Need Assistance with Endpoint Management?
Contact our team today to schedule a call with one of our experts.